In the fast-paced world of web development, Angular components have emerged as powerful tools to build robust and scalable applications. But with great power comes great responsibility. To truly harness the potential of Angular components, developers must follow best practices for efficient development.
In this article, CloudVandana will delve deeper into the world of Angular components, uncovering the secrets to optimizing their performance and enhancing productivity. From organizing project structure to implementing reusability, we explore the key techniques that can make a significant difference in your development process.
By adopting these best practices, you can ensure a seamless user experience, faster loading times, and maintainable codebase. Whether you are a seasoned Angular developer or just starting your journey, this article is packed with valuable insights to take your skills to the next level.
Benefits of using components in Angular
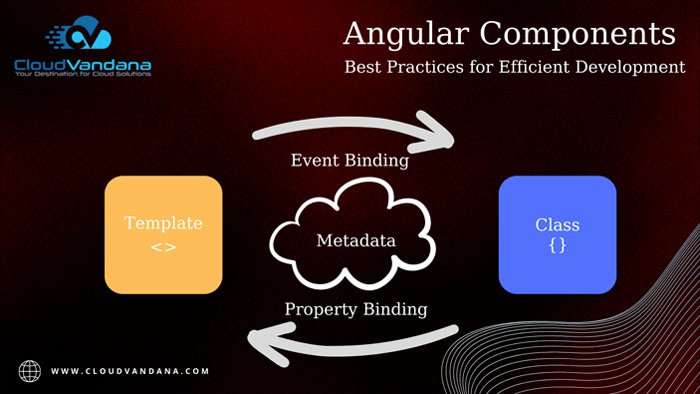
Angular components play a crucial role in building modern web applications. They encapsulate the application’s UI and behavior, making managing and reusing code easier. Components act as building blocks, representing different parts of the user interface and enabling developers to create complex applications by combining and nesting them.
One of the main advantages of using components in Angular development is their reusability. By encapsulating specific functionality within an element, you can easily reuse it across different parts of your application. This not only saves development time but also ensures consistency and maintainability.
Angular Components also enhance code modularity, making understanding and maintaining the application’s structure easier. Each component has its template, style, and logic, which promotes a clean separation of concerns. This allows developers to work on different application parts independently, leading to improved collaboration and productivity.
In addition, Angular components enable a reactive and dynamic user experience. By leveraging Angular’s data binding and change detection mechanisms, components can respond to user input and update the UI in real time. This enables developers to create interactive applications that provide a seamless and engaging user experience.
Tips for efficient component development
Proper organization and structuring of Angular components are essential for efficient development and maintainable codebase. Following best practices in this area can significantly improve your code’s readability, scalability, and reusability. Let’s explore some essential best practices for organizing and structuring components:
1. Use a Component-Based Folder Structure: Organize your components into folders based on their functionality or features. This helps maintain a clear separation of concerns and makes navigating and locating specific components easier. Consider using a modular folder structure that aligns with the architecture of your application.
2. Group Related Files Together: Keep all the files related to a component, such as its HTML template, CSS styles, and TypeScript code, in the same folder. This improves code organization and makes it easier to understand the component’s implementation at a glance. Use meaningful file names that reflect the purpose or functionality of the component.
3. Follow the Single Responsibility Principle: Ensure each component has a single responsibility and does one thing well. This promotes code modularity and makes understanding, testing, and maintaining the component easier. Avoid creating large components that handle multiple functionalities, as they can become difficult to manage and reuse.
4. Separate Presentational and Container Components: Follow the container-presentational component pattern, also known as the smart-dumb component pattern. Separate the presentation logic (dumb components) from the data manipulation and state management logic (smart components). This improves code readability, reusability, and testability.
5. Use Angular CLI for Component Generation: Leverage the power of Angular CLI’s component generation commands to create new components. This ensures a consistent and standardized structure for your components, saving development time and reducing the chance of errors. Use the `ng generate component` command to create new components with their associated files and boilerplate code.
Adopting these best practices for organizing and structuring your components can improve code maintainability, enhance collaboration among team members, and ensure a scalable architecture for your Angular applications.
Understanding component communication in Angular
Efficient component development requires combining technical skills, best practices, and effective strategies. This section will explore some tips and techniques that can help you streamline your component development process and boost your productivity.
1. Plan and Prototype: Plan and prototype your application’s UI and functionality before diving into component development. This allows you to identify potential challenges and design a component structure that aligns with your requirements. Consider creating wireframes or mockups to visualize the layout and interaction of your components.
2. Keep Components Small and Focused: Aim to create small, focused components responsible for a specific part of the UI or functionality. This promotes code reusability and makes understanding and maintaining the codebase easier. Avoid creating monolithic pieces that handle multiple responsibilities, as they can become challenging to manage and reuse.
3. Follow the DRY Principle: Don’t Repeat Yourself (DRY) is a fundamental principle of software development. Avoid duplicating code or logic across multiple components. Instead, extract standard functionality into separate services or utility functions and share them among different components. This reduces code duplication and ensures consistency throughout your application.
4. Use Angular CLI Shortcuts: Angular CLI provides several shortcuts and commands that can speed up your component development process. For example, you can use the `ng generate component` command with additional flags to generate associated files automatically, such as HTML templates, CSS styles, and unit tests. Explore the full range of Angular CLI commands to leverage its power and improve your development workflow.
5. Leverage Angular Material: Angular Material is a UI component library providing pre-designed and ready-to-use components. By leveraging Angular Material, you can accelerate your component development process and ensure a consistent and visually appealing UI. Explore the available components and use them whenever appropriate to save development time and effort.
By following these tips and techniques, you can streamline your component development process, improve code quality, and deliver high-performing Angular applications.
Using component lifecycle hooks effectively
Component communication is a fundamental aspect of building Angular applications. Components often need to share data, pass information, or trigger actions between each other. This section will explore the different ways to achieve component communication in Angular.
1. Parent-Child Component Communication: In Angular, you can establish communication between parent and child components using input and output properties. Parent components can pass data to child components using input properties, while child components can emit events to notify the parent components using output properties. This allows for a unidirectional flow of data and actions between components.
2. Service-Based Component Communication: Services act as a centralized communication channel for components that are not directly related. Components can inject and use services to share data, trigger actions, or exchange information. Services can be used to implement common functionality, manage shared state, or facilitate inter-component communication.
3. Event Emitters and Observables: Angular provides event emitters and observables to facilitate component communication. Event emitters allow components to emit custom events and notify other components about specific actions or changes. Observables enable components to subscribe to data streams and receive updates whenever the data changes. This is particularly useful for asynchronous communication and handling data from external sources.
4. Route Parameters and Query Parameters: Angular’s routing mechanism allows components to communicate through route and query parameters. Components can extract parameters from the URL to fetch data or modify their behavior. This enables components to share information across different routes and navigate to specific views based on user input or application state.
By understanding and leveraging these different techniques for component communication, you can build flexible and interconnected Angular applications that meet the requirements of complex user interfaces and workflows.
Handling component dependencies and injection
Angular provides a set of lifecycle hooks that allow you to tap into different stages of a component’s lifecycle. By understanding and using these hooks effectively, you can perform specific actions or implement custom logic at the appropriate time. Let’s explore some of the key component lifecycle hooks in Angular:
1. ngOnInit: The `ngOnInit` hook is called after the initialized component and its inputs are bound. This is a good place to perform initialization tasks, such as fetching data from a server or setting up subscriptions. It is also the ideal place to initialize component-level variables and properties.
2. ngOnChanges: The `ngOnChanges` hook is called whenever the component’s input properties change. This allows you to react to changes in input values and perform specific actions. You can access the previous and current values of the input properties using the `SimpleChanges` object.
3. ngAfterViewInit: The `ngAfterViewInit` hook is called after initializing the component’s view and child views. This is an excellent place to manipulate DOM or interact with child components. It is important to note that this hook is not called during server-side rendering.
4. ngOnDestroy: The `ngOnDestroy` hook is called just before the component is destroyed and removed from the DOM. This is a good place to clean up resources, such as unsubscribing from subscriptions or releasing memory. It is important to perform necessary cleanup tasks to avoid memory leaks and ensure optimal performance.
By using these lifecycle hooks effectively, you can control the behavior of your components at different stages and ensure proper initialization, cleanup, and interaction with the DOM and other components.
Testing and debugging Angular components
Dependency injection is a key concept in Angular that allows you to manage and inject dependencies into your components. By leveraging dependency injection, you can easily create modular and testable components. Let’s explore how to handle component dependencies and injection effectively:
1. Provider Configuration: Providers are responsible for creating and configuring dependencies that can be injected into components. You can configure providers at different levels, such as component, module, or application levels. Providers can be registered as classes, factory functions, or values. Consider the scope and lifetime of your dependencies when configuring providers.
2. Constructor Injection: Constructor injection is the most common way to inject dependencies into a component. By declaring the dependencies as constructor parameters, Angular’s dependency injection mechanism will automatically resolve and provide the necessary dependencies when creating an element instance. This promotes loose coupling and makes your components easier to test and maintain.
3. Injectable Decorator: To enable dependency injection, you must decorate your services and components with the `@Injectable` decorator. This decorator tells Angular that a class has dependencies and should be managed by the dependency injection system. Make sure to add the `@Injectable` decorator to all your service classes and any component with dependencies.
4. Hierarchical Injection: Angular follows a hierarchical injection system, where dependencies are resolved based on their availability in the component’s injector tree. If a dependency is not found in the component’s injector, Angular will look for it in the parent component’s injector until it reaches the application’s root injector. This allows you to share dependencies across components and manage their scope effectively.
By effectively handling component dependencies and using dependency injection, you can create modular and testable components, improve code maintainability, and ensure proper separation of concerns.
Conclusion and next steps for mastering Angular components
Testing and debugging are integral parts of the development process. Let’s explore techniques and tools to test and debug Angular components effectively.
1. Unit Testing: Unit testing is a crucial aspect of component development. Angular provides a robust testing framework that allows you to write unit tests for your components. Use tools such as Jasmine and Karma to write and execute tests that verify the correctness of your component’s behavior—test scenarios, edge cases, and input combinations to ensure robust and reliable components.
2. Component Testing Utilities: Angular provides a set of testing utilities that make it easier to test components. These utilities allow you to create component instances, interact with the component’s DOM, trigger events, and inspect the component’s state and output. Familiarize yourself with the `ComponentFixture` and `TestBed` utilities to test your components effectively.
3. Debugging Tools: Angular provides various debugging tools that can help you identify and fix issues in your components. The Angular DevTools extension for Chrome and Firefox visually represents your component tree, allows you to inspect component properties and state, and provides real-time performance metrics. Use the browser’s built-in developer tools to debug your code, set breakpoints, and step through the execution flow.
At CloudVandana, we recognize the importance of staying at the forefront of technological advancements, and our commitment to Angular best practices is a testament to our dedication to delivering high-quality solutions. By following the guidelines, we ensure that our development teams create robust, scalable, and maintainable Angular applications that meet the evolving needs of our clients. Call CloudVandana today for a faster deployment experience. Call Now for more details.

Digital Marketing Manager at Cloudvandana Solutions
Request a Free Consultation
YOU MIGHT ALSO LIKE

The Future of Work Management: From Manual Updates to AI-Powered Execution

Salesforce Implementation Checklist for Growing Businesses

Salesforce Health Check Checklist: 15 Things Every Business Should Review Quarterly

Salesforce Consulting Services: When Should a Business Hire an Expert?

Salesforce Automation vs AI Agents: What Should Businesses Use First?