Salesforce Data For Importing
The task of preparing the Salesforce data for Importing can be a daunting task, but the process doesn’t have to be complicated. Follow this guide by CloudVandana to learn how to quickly and easily organize any-size data sets for import into Salesforce, allowing you to keep your system up-to-date with the most recent information.
Understand Any Restrictions Before You Start
Before you start preparing your data sets for importing into Salesforce, it’s important to understand any restrictions that might be in place. For example, there might be certain fields or characters that aren’t allowed in Salesforce, and these will have to be removed or changed before the data can be imported. Always double-check any import expectations from Salesforce beforehand so that your data is formatted correctly and won’t cause any errors during the import process.
Recognize the Data Formats That Can be Imported into Salesforce
This platform can accept a variety of data formats, including .csv and .xml. Before you start preparing your data for uploading, it’s important that you determine which file format is acceptable for your import. Additionally, there may be other restrictions or preferences associated with the different file formats, so make sure to read up on any guidelines before selecting one.
Clean Up the Source Data Set by Removing Duplicates and Unwanted Columns
Before you can import your data, you need to clean it up by removing any duplicate records and unwanted columns. Doing this will make sure that the imported source data is uniform and organized so that everything can be stored in the correct place. To do this, you can use a spreadsheet tool like Excel or Google Sheets to help manage and organize your data.
Break Your Source File Into Smaller Pieces (if Necessary) to Prevent Time-outs During Uploading Processes.
If you have a lot of files that need to be imported, it’s important to break them into smaller parts. This will allow for faster uploading times and give you fewer time-outs due to the large file size. To do this, use a spreadsheet tool like Excel or Google Sheets to delete unnecessary columns, rows, and data. By reducing your source file size, you’ll speed up the uploading process and avoid any time-outs during the import process.
Validate Your Data for Quality Assurance and Easy Searchability After Importing to Salesforce
After breaking the data sets into smaller parts and importing them to Salesforce, it’s important to validate them for quality assurance. This means checking for spelling errors, duplicates, and other typos that may have been introduced during the process. You’ll also want to check whether the fields have been mapped properly using a query tool on top of Salesforce. Once this is done, you can ensure all your records are searchable and easy to access so they can be used quickly.
Are you looking for a reputed Salesforce partner for successful Salesforce implementation and maintenance? Please feel free to schedule a consultation call with CloudVandana and get the solution best suited for your business. Call Now.

Digital Marketing Manager at Cloudvandana Solutions
Request a Free Consultation
YOU MIGHT ALSO LIKE

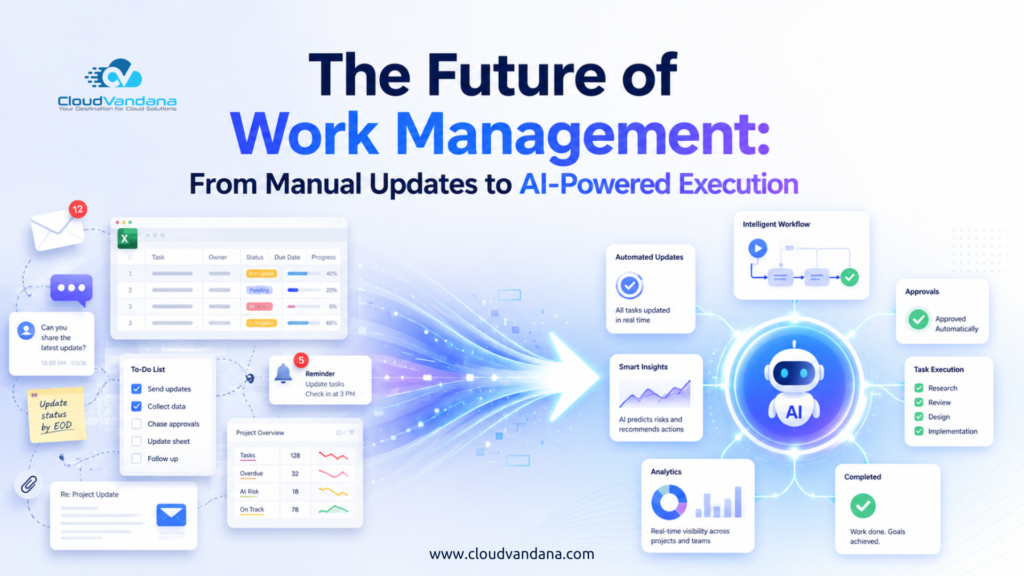
The Future of Work Management: From Manual Updates to AI-Powered Execution

Salesforce Implementation Checklist for Growing Businesses

Salesforce Health Check Checklist: 15 Things Every Business Should Review Quarterly

Salesforce Consulting Services: When Should a Business Hire an Expert?

Salesforce Automation vs AI Agents: What Should Businesses Use First?