CV TimeLogger is a very useful innovation of CloudVandana Solutions. CV TimeLogger helps to track the time spent by the team on their tasks and if the tasks are completed or not. It’s an Enterprise-Grade application designed to help the user(Manager, Supervisor, Company Owner) to manage tasks and the time spent by your team/employees on each task.
Visit the link to more about Cv TimeLogger https://www.cvapp.store/product/cv-time-logger/
CV Timelogger Installation Steps:
We recommend installing the app in the sandbox first and then install in production if everything looks fine.
- Please enter the login details of your salesforce administrator if you are presented with the login screen.
- Once you are presented with the installation screen, you must select which users should be granted access to the CV TimeLogger app, including all its components.
- Most customers should select the middle option “Install for All Users,” ensuring that all users have the proper permissions should they be assigned a license in the next step.
Click the Checkbox as shown to Acknowledge your installation.

Once you make your selection, click the Install button.
Once the installation is complete, click the Done button to return to your Salesforce org. You may see a message stating that the installation is taking a long time to complete. In this case, you will receive an email once the installation finishes.

Now CV TimeLogger is Installed in your System.
You can verify the same in the installed packages. From Setup, Search Installed Package and Click “Installed Packages” to view.

Configuration Steps
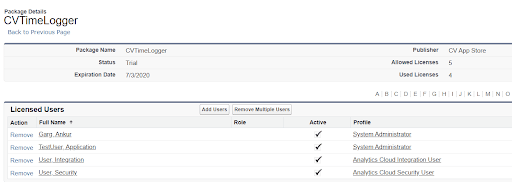
Manage Licenses
By default application license will be assigned to the system administrator who installed the application.
You can assign the licenses to the users as per the allowed licenses depending on the subscription.
Note: You can contact us at “support@cvapp.store” in case you see any discrepancy
From Setup, Search Installed Package and Click “Installed Packages”
Click on the Manage Licenses link for CV TimeLogger.

On Next Screen, Click on Add Users, or if you need to remove any existing user, then click on Remove Action.
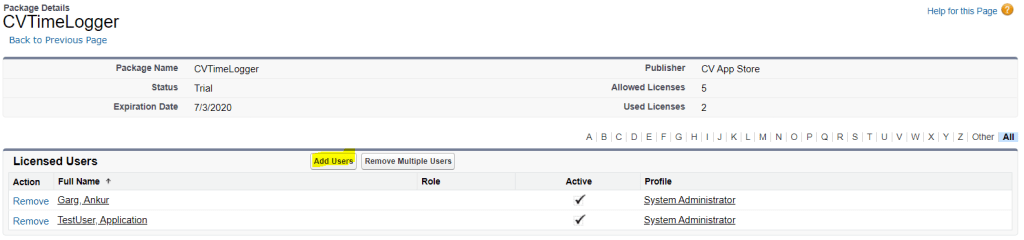
Select the users for whom you want to give access to the app from the list of Available Users
Click on the Add button.

On the Next screen, you will see the list of users who can access this App.
Add CV TimeLogger Interface to Lightning Page
CV TimeLogger interface can be added to any Lightning record page, the home page, or the app page.
From the Home tab or any record detail page, click the gear icon at the top right corner and select Edit Page to open the Lightning App Builder.

To Edit any other Page, from setup, enter App Builder in the quick find search box, then click on Lightning App Builder.
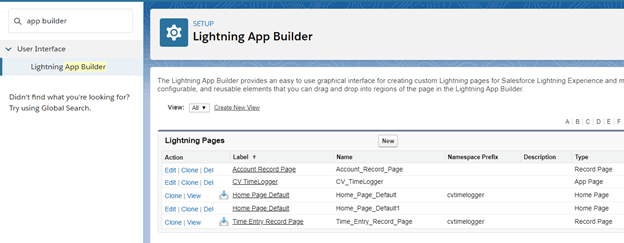
Enter cvTimeLogger on the search component from the left.

Drag and Drop the CVTimeLogger component on your page layout at the desired section.
Click Save, and then click Activate.
You have a few options for activating a record page.
- Make the page the org default for the object.
- Make the page the default object record page for specific Lightning apps.
- Assign the page to a combination of Lightning apps, record types, and profiles.
- Assign the page to a form factor, such as a desktop or phone.
On the activation screen, click the tab for the chosen option and follow the steps to activate the page.
Visit salesforce help to learn more about Lightning Pages. (Video Purpose)
Give permission of objects to the profile
From Setup, Enter Profiles in the Quick Find box, then select Profiles
Enhanced profile user interface—In the Find Setting.. box, enter the object’s name and select it from the list. Click Edit, then scroll to the Object Permissions section.
Original profile user interface—Click Edit, then scroll to the Standard Object Permissions, Custom Object Permissions, or External Object Permissions section.
Specify the object permissions for CV Exception Records(Check Read and Create Checkbox Only), CV tasks, and CV Time Entries.
Click Save.
If you are unfamiliar with which access is suitable, visit Object Permission from Salesforce Help and Training.

With CV TimeLogger’s easy-to-use Interface, you can view and update hours throughout the entire platform. Create CV Tasks and Assign them to your team.
Create CV Task
If you are a Manager, Supervisor, or need to assign a CV task to your colleague or yourself. You can use CV TimeLogger Interface to create a CV task easily and quickly.
Access CV TimeLogger App by clicking on the app launcher and searching for CV TimeLogger app.
Click on CV TimeLogger to open the app.

You will see the Time Tracking component on the homepage to log time and create CV tasks.

Tap on the icon in the Top Right corner of the interface.
Enter “Assigned To” and the Necessary details.

Click Save
New CV Task will get highlighted on the interface of the assigned user. CV task will be available for all the Dates from the Start to the End Date of the Assigned CV task.

Alternatively:
You can click on the CV tasks Tab from your CV TimeLogger App. Click on the New button to create a CV task.

Enter Assigned To and the necessary details.
Click Save.

You can use a list view to see all the CV tasks created or Assigned.

Visit here from Salesforce help & Training for more information on List views.
Log CV Time Entries
CV Time Tracking interface quickly shows all your assigned CV tasks for any specific date with a calendar option and manual navigation. It allows you to enter your hours and view logged CV Time Entries.
- Access the CV TimeLogger App by clicking on the app launcher and searching for the CV TimeLogger app.
- Click on CVTimeLogger to open the app

- You will see the Time Tracking component on the homepage to log time and create CV tasks.
- You can Select the Date using calendar view or use prev. and the next arrow to navigate to the required date.
- Click on the Assigned CV task to open the option to add or update the CV time entry.
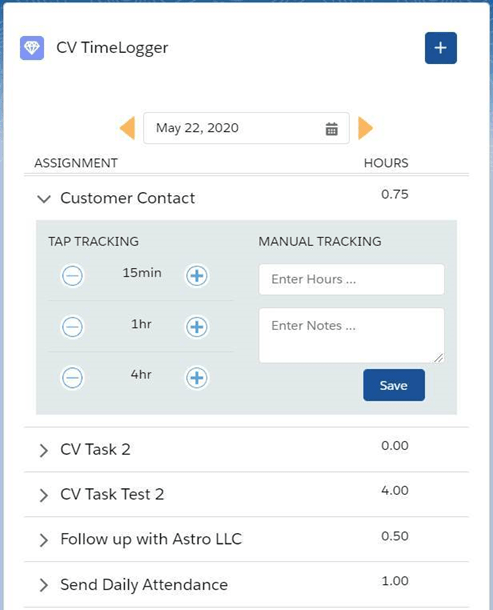
- Use the Tap Tracking feature to click on + or – button to add time in intervals of 15min, 1hr, and 4hr.
- With Manual Tracking, you can type Hours and add Notes for your time entries.

- For the Unsaved CV time entry, an asterisk (*) will appear next to the logged Hours value.
- Click Save to log the CV time entry for the given date. Now the asterisk (*) will disappear from that CV task. It is easy to identify the unsaved CV time entry with this interface.
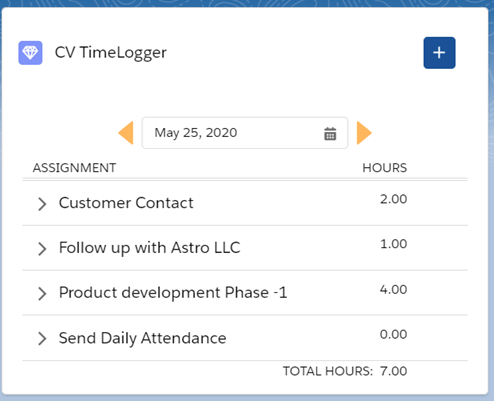
View Hours entered for individual Assignment and as well as Total Hours entered for that day.
Key Points:
- CV task will appear in the interface if the “Assigned To” is equal to log-in User and the Date selected on the interface is between the Start and End date of CV Tasks.
- If you refresh or load the page, then the interface will show already logged CV Time Entries with Hours and Notes.
- You can create only a single CV Time Entry in a Day for any Assigned CV Task. This framework is easy to manage your time.
- Existing CV time entries will get updated if you make any changes in Hours or Enter Notes for the logged CV Time Entry for that Task in a Day.
Setup and Use CV TimeLogger in Mobile
CV TimeLogger Mobile App Setup
With CV TimeLogger, you can track CV time entries on your salesforce mobile app in a very efficient manner.
From Setup, Enter Navigation into the Quick Find search box and click on Salesforce Navigation

From the list of available components on the left, select CV TimeLogger Mobile, then click Add.
Once complete, click Save.

The app is ready to use on Mobile to log hours with an interactive interface.
Use CV TimeLogger on Mobile App
Once the Mobile setup steps are completed, you can easily use the CV TimeLogger interface to create and update CV time entries. You can view all your assigned CV Tasks and logged hours in this interface between the start and end date of your assigned CV tasks.
Use the + or – button on Tap tracking to log hours or click on Enter Hours box to enter the hours manually and click on save.

How to Navigate
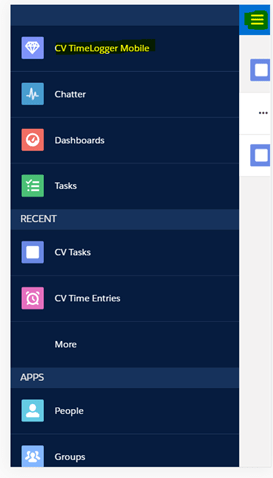
Click on the Menu option and select CV TimeLogger Mobile as shown. If you have another version of the app and it is not available, then click on the Menu Button and App launcher.
Select the Mobile Only App to access the CV TimeLogger Mobile Interface.

You will have a seamless experience of the CV TimeLogger application with the same interface as that of a desktop in Mobile.
To access Reports, Dashboard, or to create New CV Tasks. Click on the CV TimeLogger tab from the App launcher.
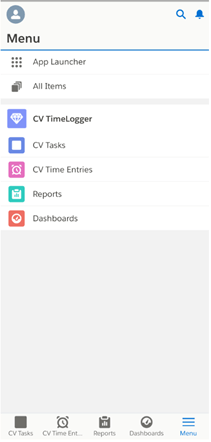
Click on CV Tasks to view recent CV Tasks or to create new CV tasks for your team or yourself. Click on the New button and enter the necessary details on the page and click save.
Click on Reports, Dashboard tab from CV TimeLogger to access “out of box” analytics.


Are you looking for such a useful product to enhance the productivity of your organization? Please schedule a free consultation call with CloudVandana, a reputed Salesforce partner from India, and get the full ROI of your Salesforce investment.

Digital Marketing Manager at Cloudvandana Solutions
Request a Free Consultation
YOU MIGHT ALSO LIKE

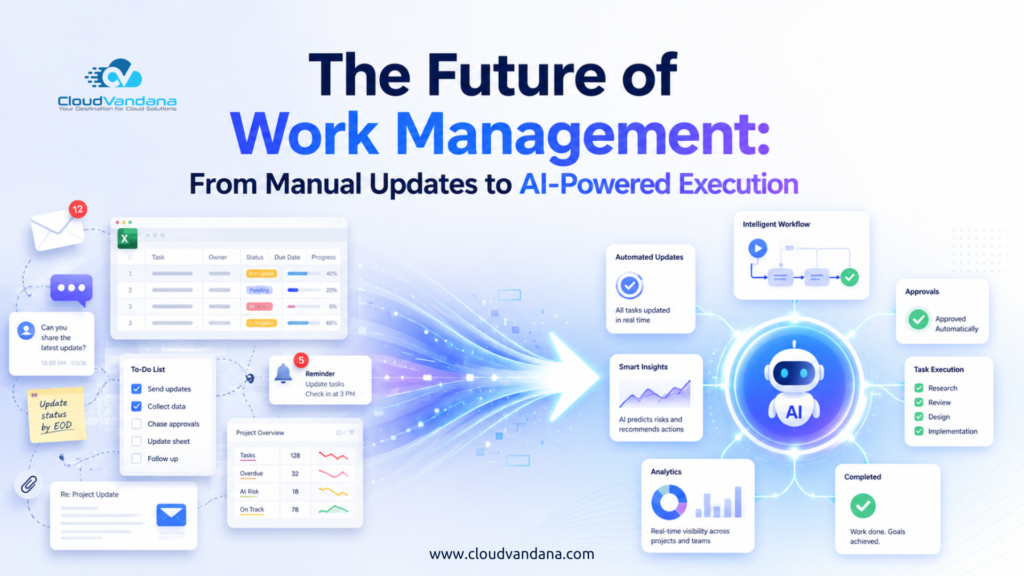
The Future of Work Management: From Manual Updates to AI-Powered Execution
Salesforce Implementation Checklist for Growing Businesses
Salesforce Health Check Checklist: 15 Things Every Business Should Review Quarterly

Salesforce Consulting Services: When Should a Business Hire an Expert?

Salesforce Automation vs AI Agents: What Should Businesses Use First?